For each order in BaseLinker panel you can create a sales document. However, it is not possible to issue an invoice without an order or to download invoices – sales or purchase invoices – from other systems.
BaseLinker enables:
- issuing sales documents
- individually from the order card,
- in bulk from the order list or
- without your participation – using automatic actions 🙂
- support of sales documents in the BaseLinker panel (creating an invoice correction, generating a JPK file, etc.),
- transfer the issued documents to an external online accounting system. In this case, you should manage them in this system and ignore the invoices issued by BaseLinker. A detailed instruction is available at Online accounting systems integrations.
- sending an e-mail with a link to the invoice or with the invoice in the attachment (both a BaseLinker invoice and an invoice from the connected online accounting system can be sent – you only need to select the option ‘Display (…) invoice to the customer instead of BaseLinker invoice’ in the module settings). For additional information please visit E-mail templates and accounts.
- printing sales documents:
- printing invoices through integration with PrintNode
- Printing fiscal receipts through integration Receipts- fiscal printer
Moreover, it is possible to transfer orders to the ERP system, and generate invoices directly in the ERP system using order data. The integration scenario with the ERP system depends on the integrator. For more information, see ERP systems integrations.
Please note that support and maintenance of each ERP module is provided by an external company. If you have any questions or problems related to the selected module, please contact the supplier of the particular integration.
Types of sales documents
The system supports four basic types of documents:
- pro forma invoice,
- standard invoice (invoice/bill),
- correction invoice (correction),
- fiscal receipt.
For each document type you can create many separate numbering series. Each numbering series can be configured differently (choose the right template, VAT rate, etc.), so you can create completely different invoice templates of each type.
Numbering series have many applications, you can create e.g.
- personal numbering for different invoice types,
- personal numbering for orders from different sources (e.g. Allegro/eBay/shop),
- different numbering for Polish and foreign invoices,
- different numbering for invoices in different languages,
- specific invoice numbers if you sell from several different companies from one BaseLinker account.
Configuration
Default settings for sales documents can be configured in Orders→ Invoices → Settings. Here you can:
- add a new numbering series,
- delete an existing numbering series,
- edit an existing numbering series.
Once you have proceeded to edit the selected numbering series, you can configure it properly by providing the required information. First, complete the fields:
-
- Series name – this name will allow you to identify the series when issuing invoices from the order card or order list, as well as when creating automatic actions.
- Document type – specify whether you create a numbering series for an invoice, pro forma invoice, correction or receipt.
- Number format – here you can choose the default monthly or annual numbering. To create an annual numbering, simply remove the ‘%M/’symbol.
VAT rate on invoice
The VAT rate on an invoice from a given numbering series is specified in the Orders → Invoices → Settings → Edit → VAT rate. Here you can:
-
- assign the fixed VAT rate (zw., 0%, 3%, 5% etc.)
- VAT on the invoice can be compliant with the tax in downloaded orders:
-
- in the case of orders from Allegro and other marketplace platforms, the VAT rate in the downloaded orders is the same as it was with the product in the warehouse at the time of the listing an offer based on it or linking product to an offer. For more information, see the article Linking offers to warehouse products.
.
- In case of orders from the store the VAT rate is taken directly with the order from the store.
-
Moreover, it is possible to create an automatic action that will perform the ‘Issue invoice’ action to the selected event. When creating this type of action in the ‘VAT rate’ field the option ‘According to the numbering series’ is selected by default. – However, here you can choose a different fixed VAT rate or use the VAT rate assigned to the product in your order.
Setting the VAT rate in automatic actions gives you additional possibilities to configure the system. This is helpful, for example, if you want to issue invoices automatically depending on e.g. the country of the order.

Shipment
In the following, choose whether the shipping cost should also be included in the invoice. If so, enter the VAT rate of the shipment and the prefix of the shipment name. The VAT rate of the shipment in the order can be fixed or proportional to the VAT in the products.
Please note that if you generate invoices using automatic actions, the ‘VAT rate’ field settings also apply to the shipment.
Payment
Invoices are issued by default in the currency in which the order was placed. This cannot be changed (e.g. an order placed in GBP cannot be invoiced in EUR).
If the order was placed in a different currency you can enable Calculate to PLN → Display summary in PLN (if the invoice is in a different currency). Then the amounts on the invoice will be converted according to the NBP rate. The exchange rate is collected automatically, and in the numbering series settings you can choose the date of the exchange rate.
You can choose whether the method of payment is to be specified on the invoice, and if so, whether it is to be the method of payment specified in the order or any other method you specify. Then choose the date of sale and the date of payment.
In addition, you can add additional information to the item name (product ID, EAN, SKU, parameters – selected variant).
Seller
Then fill in information such as ‘City’ and ‘Issuer’.
Don’t forget to enter the seller’s details in the “Seller” field. Remember that the settings in Account/other → My account → Invoice details only apply to invoices you receive from us.
Information
In the “Information” field you can place additional information, such as your account number.
You can also use [client_comments] and [seller_comments] tags here to add selected comments to your invoice.
With tags you can easily put a lot of additional information on the invoice. For example, to place a customer login on your invoice, all you have to do is put the [seller_comments] tag in the ‘Information’ field and then create an automatic action that will perform the ‘Modify order’ action upon the selected event and put the [client_login] tag in the ‘Comments’ field.
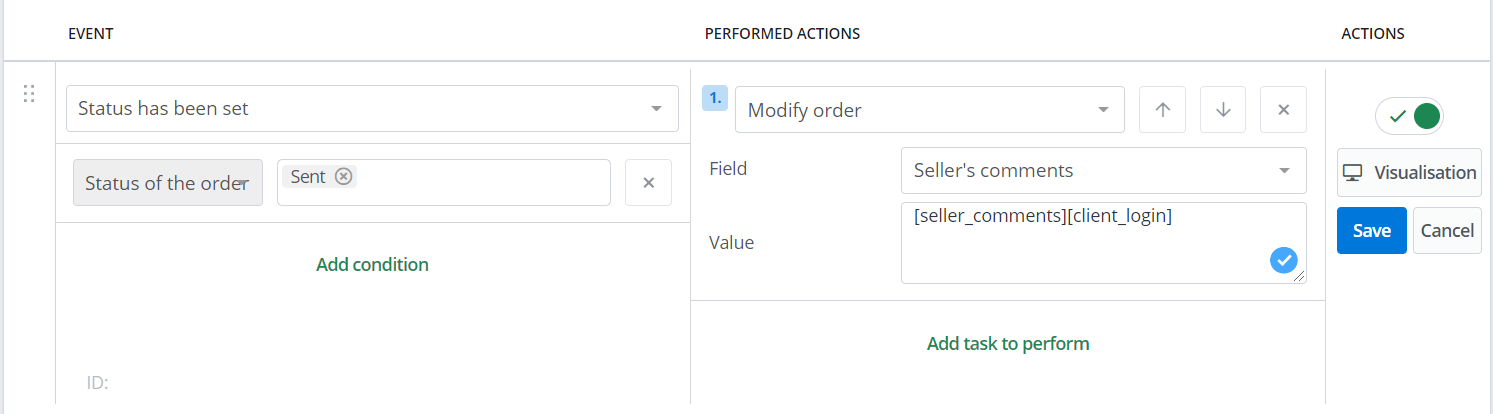
Remember that such action will overwrite the current comments with the client’s login. To keep the current comments and add the client’s login to them you need to enter in the action a modification of the comments field like “[seller_comments][client_login]” which will insert the login after the current comments of the order.
Here you can also add an HTML code that will display barcode on the invoice. This should appear at the bottom of the invoice.
Default template
.
In the system are available:
- default invoice template (cannot be edited),
- your own individual invoice templates.
The default template allows automatic language selection of the invoice (e.g. Polish / English / German), according to the buyer’s country.
Another possibility is to issue translated invoices, in two languages – main and additional, or to create completely separate templates and numbering series for each invoice language.
The default template contains the following fields:
- The main language
- Additional language
- Header – text displayed at the top of the invoice (e.g. company name). Here you can use HTML tags to insert e.g. company logo in the header. Example of logo setting: <img src=”http://site.com/image.jpg”>
- Document name
- Single price
- Show VAT
- Order number
- The payment ID
- The recipient’s signature
- The “Original/Copy” note. – in order for the invoice to show only ‘Original’ or only ‘Copy’ you need to create your own template.
- Number of copies
Personal template
If you are not satisfied with the default invoice template, you can create your own in the Orders → Printouts and Exports section. The easiest way to do this is to use a template we have placed there as a base – “Alternative invoice”.
How do I create your own invoice template?
- Subscribe the “Alternative invoice” printout under Orders → Printouts and exports.
- Duplicate the “Alternative invoice” printout.
- Edit the invoice template according to your needs.
- Set your new template as default in the Invoice Settings window (Orders → Invoices → Settings → Edit → Printout Template).
Your own invoice template has certain limitations:
- Can only appear in one language (if you issue invoices in multiple languages, you will need to add your own invoice templates in each language to the system – the invoice will not be automatically translated as in the default invoice).
- Shows no conversions and no amount written in words.
- The table with individual vat rates is not displayed, only the total vat.
- It is not possible to create your own template for a correction invoice.
Invoicing with buyer and recipient
There is an invoice template available in the system, which shows both the buyer and the recipient of the invoice (payer and recipient).
To use the print, create a new invoice numbering series and use our invoice template “Invoice buyer and recipient”:
- Subscribe the “Invoice buyer and recipient” printout in Orders → Printouts and exports.
- Create a new numbering series in Orders → Invoices → Settings.
- Set the subscribed printout as the default template for the new numbering series (Orders→ Invoices → Settings → Edit → Printout template).